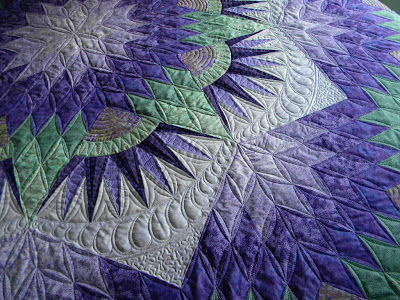
Carol's mom started this quilt and she and her neighbor finished it. It was a pretty large quilt and completely square! Love that! I did feathered curl on it. Pretty..pretty..
Monday, November 22, 2010
Saturday, November 20, 2010
This is Stacy's quilt. I figured a cute little modern baby quilt needed some modern quilting!
This is also Stacy's. This is a sweet baby girl quilt. I used Daisy Meandering on it.
How fun is the floppy ears on this dog quilt that Betty put together.
My brother Lowell would love this quilt. So realistic!
This is a cute little shop sample for Calico Creations in Mt. Vernon. The fabric is so cute!
Friday, November 19, 2010
This is a fun Harley Davidson T-Shirt quilt. Helen put this together for one of her customers and I did the quilting on it. I used Spiral Square. Fun, fun, fun....
Tamara made this cute "Crab Apple Hill" quilt. The hand work that go's into these quilts always amaze me. It was fun to quilt.
Did a fun swirl on Debbies quilt...can't tell but I used a blue and brown variegated thread (lava by Superior Threads). It was perfect for the batiks in this quilt.
Friday, November 12, 2010
Oohh....those wavy borders!
So no photos today, but another subject I think is really important! How to apply a border or borders to a quilt.
For years I use to sew my borders on to my quilt by starting on the top and sewing down to the edge of the quilt and then just cutting off the remaining.
Then I became a longarm quilter and found out that by doing that can possibly create some wonky quilts and wavy borders. I have directions on my Website on how to add borders to a quilt, but wanted to share them here too.
We longarmers come across this often when quilting for others. I think that some quilters are just unaware of how to apply borders and how it affects the squareness of the quilt and the difficulty it can be to quilt it.
It really is a simple thing that can make such a huge difference. Thanks for taking the time to read this. If you have any comments on the subject feel free to share...
Thanks
For years I use to sew my borders on to my quilt by starting on the top and sewing down to the edge of the quilt and then just cutting off the remaining.
Then I became a longarm quilter and found out that by doing that can possibly create some wonky quilts and wavy borders. I have directions on my Website on how to add borders to a quilt, but wanted to share them here too.
Directions for applying borders:
- Determine the length of the quilt border by averaging the two or three center measurements of the quilt body.
- Cut two borders that length and pin them to opposite sides of the quilt. Match the ends and centers, then gently ease in any fullness.
- Pin, sew, and press
- Repeat for the top and bottom borders.
We longarmers come across this often when quilting for others. I think that some quilters are just unaware of how to apply borders and how it affects the squareness of the quilt and the difficulty it can be to quilt it.
It really is a simple thing that can make such a huge difference. Thanks for taking the time to read this. If you have any comments on the subject feel free to share...
Thanks
Thursday, November 4, 2010
Compass Star
This is Venita's quilt, which she did a very nice job. The pattern is Compass Star by Roxanne Carter. I combined a couple of different quilting styles on this quilt and was pleased with the results. I think it turned out great!
Subscribe to:
Posts (Atom)


